General Compute Setup on GCP
Last Updated 25/08/2019 by Tristan Maske (masket@telkom.co.za)
Contents
Recommended Reading
This guide should enable you to fully reproduce our current General Compute setup. If you want more context to what you are doing and why, please go through the following documentation
Tableau
Infrastructure & Environment
- Tableau Server on Linux: Everybody's Install Guide
- Minimum Hardware Requirements and Recommendations for Tableau Server
- Install Tableau Server on the Google Cloud Platform
- Self-Deploy Tableau Server on the Google Cloud Platform in a Distributed Environment
Installation & Setup
- Before you install
- Best Practices for Installing Tableau Server on the Google Cloud Platform
- Recommended Baseline Configurations for Multi-Node Installations
- Distributed and High Availability Tableau Server Installations
- Configure SSL for External HTTP Traffic to and from Tableau Server
- Trusted Authentication
Google Cloud Platform
Networking
Load Balancer
Conventions TO BE REMOVED
Naming
We use "general-compute" as a prefix for all names. This is followed by the deployment number(currently 1). Finally a short description of what it is such as "load-balancer-ip" or "worker-1".
general-compute-1-vpc general-compute-1-load-balancer-ip general-compute-1-master general-compute-1-worker-0
When naming things are are contained within a particular environment, its okay to leave out the "general-compute-\<number>" prefix.
master-internal-ip
Security
Installation
Network Setup
- Reserve static public IP address for the load balancer
- Name → general-compute-1-load-balancer-ip
- Description → The static public IP address of the load balancer in front of general-compute
- Network Service Tier → Premium
- IP version → IPv4
- Type → Global
- Create the VPC Network
- Name → general-compute-1-vpc
- Description → A VPC for the general compute network in EUW4
- Subnet creation mode → Custom
- Subnet name → general-compute-1-subnet
- Region → The region you want to host the load balancer in
- IP address range → make sure you create a network with enough IP’s
- 10.0.0.0/29 for 3 nodes
- 10.0.0.0/28 for 5+ nodes
- Private Google access → On
- Flow logs → Off
- Dynamic routing mode → Regional
- DNS server policy → No server policy
- Configure VPC Network
- Select the new network on the GCP VPC Networks page
- Create a static IP address for each instance under ‘Static internal IP addresses’
- Name → \
-internal-ip - Description → Static internal IP address for \
- Static IP address → Let me choose
- IP address for \
- Name → \
- Configure firewall rules for the network under ‘Firewall rules’
- Allow Echo API (Trusted Auth)
- Name → general-compute-1-vpc-allow-echo-api
- Description → Allows remote requests reach the Echo API on port 8080. The API's primary function is to perform Tableau Trusted Auth as well as administratively modifying Firebase Auth and Firestore.
- Targets → Specified target tags
- Target tags → echo-api
- Source IP ranges → ~~130.211.0.0/22 and 35.191.0.0/16~~ 0.0.0.0/0
- Protocols and ports → tcp:8080
- Allow HTTPS (Tableau)
- Name → general-compute-1-vpc-allow-https
- Description → Allows the load balancer to reach the Tableau web server for all embedded and web UI, should be for all nodes configured to run a gateway service and as a backend for the load balancer
- Targets → Specified target tags
- Target tags → tableau-gateway
- Source IP ranges → 130.211.0.0/22 and 35.191.0.0/16
- Protocols and ports → tcp:443
- Allow tabadmincontroller (Tableau)
- Name → general-compute-1-vpc-allow-tabadmincontroller
- Description → Allows direct HTTPS access to the master instance for access to the tabadmincontroller web UI
- Targets → Specified target tags
- Target tags → tableau-master
- Source IP ranges → 0.0.0.0/0
- Protocols and ports → tcp:8850
- Allow Internal
- Name → general-compute-1-vpc-allow-internal
- Description → Allow internal traffic to flow between instances on this subnet
- Targets → All instances in the network
- Source IP ranges → 10.0.0.0/28 (subnet IP range)
- Protocols and ports → Allow All
- Allow SSH
- Name → general-compute-1-vpc-allow-ssh
- Description → Opens port 22 to allow SSH from all addresses
- Targets → All instances in the network
- Source IP ranges → 0.0.0.0/0
- Protocols and ports → tcp:22
- Allow Echo API (Trusted Auth)
Instance Setup
- Create Instances
- Select "New VM instance from template"
- Select the correct template (master or worker)
- Make sure each node is within the same region but different zone
- Scroll down and select “Management, security, disks, networking, sole tenancy”
- Make sure all the required tags are selected
- Make sure the master has “IP Forwarding” checked
- Make sure your VPC network is selected, assign the instance an address from the subnet, assign an ephemeral external IP
- Install Tableau
Perform the following steps on each newly created instance
- SSH into all instances
- Get your username with
whoami - Set a password for your user with
sudo passwd <user.name>. This password will automatically propagate to Tableau - Run the following commands:
shell sudo apt-get update sudo apt-get -y install locales sudo apt-get -y install language-pack-en - Get the link for the latest version of Tableau Server
- Download it to all of the instances
sudo wget <link> - Install gdebi & Tableau:
shell
sudo apt-get -y install gdebi-core
sudo gdebi -n tableau-server-<version>_amd64.deb
- Configure Tableau
Perform the following steps on the master instance only
- Initialize Tableau Services Manager (TSM)
shell sudo /opt/tableau/tableau_server/packages/scripts.20191.19.0215.0259/initialize-tsm --accepteula - Activate the license or trial
shell tsm licenses activate -k <product key>` OR `tsm licenses activate -t - Register the server
shell echo { \"zip\" : \"7700\", \"country\" : \"South Africa\", \"city\" : \"Cape Town\", \"last_name\" : \"Maske\", \"industry\" : \"Telco\", \"eula\" : \"yes\", \"title\" : \"Developer\", \"phone\" : \"+27760550470\", \"company\" : \"Telkom\", \"state\" : \"Western Cape\", \"department\" : \"Insights\", \"first_name\" : \"Tristan\", \"email\" : \"masket@telkom.co.za\"} > ~/tab-reg.json tsm register --file ~/tab-reg.json - Configure identity store and other settings.
- Get the following close to you:
- FQDN → The FQDN that clients will use to reach Tableau Server through the load balancer
new.tableau.strategicinsights.co.za - IP → The address or the CNAME of the load balancer
35.241.45.221 - other → Alternate names for the proxy server, such as its fully qualified domain name, any not fully qualified domain names, and any aliases
www.new.tableau.strategicinsights.co.za
- FQDN → The FQDN that clients will use to reach Tableau Server through the load balancer
- Create the config file:
shell echo {\"configEntities\": {\"identityStore\": {\"_type\": \"identityStoreType\",\"type\": \"local\"}}, \"configKeys\": {\"gateway.public.host\": \"<FQDN>\", \"gateway.public.port\": \"443\", \"gateway.trusted\": \"<IP>\",\"gateway.trusted_hosts\": \"<other>\"}} > ~/tab-ids.json - Example:
shell echo {\"configEntities\": {\"identityStore\": {\"_type\": \"identityStoreType\",\"type\": \"local\"}}, \"configKeys\": {\"gateway.public.host\": \"new.tableau.strategicinsights.co.za\", \"gateway.public.port\": \"443\", \"gateway.trusted\": \"35.241.45.221\",\"gateway.trusted_hosts\": \"www.new.tableau.strategicinsights.co.za\"}} > ~/tab-ids.json - Apply the settings from the config file:
shell
    tsm settings import -f ~/tab-ids.json
- Get the following close to you:
- Apply the changes & initialise the server:
shell
   tsm pending-changes apply
   tsm initialize --request-timeout 1800
- Initialize Tableau Services Manager (TSM)
- Finalise Tableau Installation
- At this point the configuration is complete and we can now either:
- Restore a backup
shell
    sudo gsutil cp gs://dev-ops-tableau-backups/ts_backup-2019-03-19.tsbak /var/opt/tableau/tableau_server/data/tabsvc/files/backups/ts_backup-2019-03-19.tsbak
    tsm maintenance restore --file ts_backup-2019-03-19.tsbak
- Restore a backup
- Configure Users
- Initial User:
shell tsm startts tabcmd initialuser --server localhost:80 --username admin - Add additional admin users to the tsmadmin groups
shell
      sudo usermod -G tsmadmin -a <user.name>
- Initial User:
- At this point the configuration is complete and we can now either:
- Multi Node Cluster Preparation
- Generate the node bootstrap file and copy it to gcs:
shell
  tsm topology nodes get-bootstrap-file --file ~/bootstrap.json
  gsutil cp ~/bootstrap.json gs://dev-ops-testing/
- Generate the node bootstrap file and copy it to gcs:
- Adding the worker nodes to the cluster
- Copy the bootstrap file from GCS to the scripts folder and initialise the workers with the bootstrap. Edit the commands as required:
shell cd /opt/tableau/tableau_server/packages/scripts.<version> sudo gsutil cp gs://dev-ops-testing/bootstrap.json . sudo ./initialize-tsm -b ./bootstrap.json -u <sudo user on initial node> --accepteula - Add the required process to the worker nodes
Perform the following steps on the master instance only
- Get the node IDs:
shell tsm topology list-nodes -v - For each node being added:
shell tsm topology set-process -n <nodeID> -pr clustercontroller -c 1 - Apply the changes and deploy the coordination service:
shell
  tsm pending-changes apply --ignore-warnings
  tsm stop
  tsm topology deploy-coordination-service -n node1,node2,node3
- Get the node IDs:
- Wait for processes to show as running as specified in docs (Servers will show as stopped):
shell tsm status -v - Cleanup the deployment and restart tsm:
shell
      tsm topology cleanup-coordination-service
      tsm start
- Copy the bootstrap file from GCS to the scripts folder and initialise the workers with the bootstrap. Edit the commands as required:
- Configure worker node processes
- Configure for either High Availability or Query Heavy environments.
- Query Heavy is our current configuration
- First set the process for worker-0, then worker-1, then remove the Fire Store from master
- Set the topology for worker-0 (node2)
shell tsm topology set-process -n node2 -pr gateway -c 1 tsm topology set-process -n node2 -pr vizportal -c 1 tsm topology set-process -n node2 -pr vizqlserver -c 4 tsm topology set-process -n node2 -pr cacheserver -c 2 tsm topology set-process -n node2 -pr searchserver -c 1 tsm topology set-process -n node2 -pr backgrounder -c 2 tsm topology set-process -n node2 -pr dataserver -c 2 tsm topology set-process -n node2 -pr pgsql -c 1 tsm pending-changes apply - Set the topology for worker-1 (node3)
shell tsm topology set-process -n node3 -pr filestore -c 1 tsm pending-changes apply - Remove the file store process from master
- Make sure the filestore process shows as
runningand notsynchronizingshell tsm status -v
- Make sure the filestore process shows as
- Decommission the filestore process on master
shell
      tsm topology filestore decommission -n node1 --override
      tsm pending-changes apply
- Set the topology for worker-0 (node2)
- Install drivers on all instances
- Oracle
shell wget https://downloads.tableau.com/drivers/linux/deb/tableau-driver/tableau-oracle_12.1.0.2.0_amd64.deb sudo gdebi tableau-oracle_12.1.0.2.0_amd64.deb - Postgres
shell
    wget https://downloads.tableau.com/drivers/linux/deb/tableau-driver/tableau-postgresql-odbc_09.06.0501_amd64.deb
    sudo gdebi tableau-postgresql-odbc_09.06.0501_amd64.deb
- Oracle
Load Balancer Setup
- Create DNS Records
- Create an A record that points the FQDN specified in step 3 of Instance Setup to the Public IP of master
- Create an A record for every other URI specified under
otherin step 3 of Instance Setup, that points to the Public IP of master
- Acquire & Enable a SSL Certificate
- Use the Acme script to acquire the SSL certificate
shell tsm stop sudo apt-get update sudo apt-get install socat curl https://get.acme.sh | sh cd .acme.sh URL=tableau.strategicinsights.co.za sudo bash acme.sh --issue --standalone -d $URL --debug sudo mkdir /opt/tableau/tableau_server/data/ sudo mkdir /opt/tableau/tableau_server/data/ssl/ sudo cp $URL/$URL.cer /opt/tableau/tableau_server/data/ssl/$URL.crt sudo cp $URL/$URL.key /opt/tableau/tableau_server/data/ssl/ tsm security external-ssl enable --cert-file /opt/tableau/tableau_server/data/ssl/$URL.crt --key-file /opt/tableau/tableau_server/data/ssl/$URL.key tsm pending-changes apply tsm start- Copy the certificates into the same directory on each node
- Make sure to retain the file name on the .key and .crt files
- More info here
- On master:
shell gsutil cp $URL/$URL.cer gs://dev-ops-testing/$URL.crt gsutil cp $URL/$URL.key gs://dev-ops-testing/ unset URL - On workers:
shell
URL=<your_url>
sudo mkdir /opt/tableau/tableau_server/data/
sudo mkdir /opt/tableau/tableau_server/data/ssl/
sudo gsutil cp gs://dev-ops-testing/$URL.crt /opt/tableau/tableau_server/data/ssl/
sudo gsutil cp gs://dev-ops-testing/$URL.key /opt/tableau/tableau_server/data/ssl/
- Copy the certificates into the same directory on each node
- Remove the ‘http-server’ network tag from master
- Remove the ‘allow-http’ firewall rule from the VPC network
- Use the Acme script to acquire the SSL certificate
- Create instance groups, one per zone
- Master Zone (Zone A)
- Select "New unmanaged instance group"
- Name → general-compute-1-zone-a
- Description→ An instance group containing all instances from ‘zone a’ that are a part of the general-compute-1 cluster
- Location → select region and zone
- Click ‘Specify port name mapping’
- https: 443
- tabadmincontroller: 8850
- echo-api: 8080
- Group type → Unmanaged instance group
- Network → general-compute-1-vpc
- Subnetwork → general-compute-1-subnet
- VM instances → Select all the instances in the zone
- Zone B
- Select "New unmanaged instance group"
- Name → general-compute-1-zone-b
- Description→ An instance group containing all instances from ‘zone b’ that are a part of the general-compute-1 cluster
- Location → select region and zone
- Click ‘Specify port name mapping’
- https: 443
- Group type → Unmanaged instance group
- Network → general-compute-1-vpc
- Subnetwork → general-compute-1-subnet
- VM instances → Select all the instances in the zone
- Zone C
- Select "New unmanaged instance group"
- Name → general-compute-1-zone-c
- Description→ An instance group containing all instances from ‘zone c’ that are a part of the general-compute-1 cluster
- Location → select region and zone
- Group type → Unmanaged instance group
- Network → general-compute-1-vpc
- Subnetwork → general-compute-1-subnet
- VM instances → Select all the instances in the zone
- Master Zone (Zone A)
- Create a new load balancer
- Select "HTTP(S) Load Balancing"
- Backend Configuration
- Name → general-compute-1-load-balancer
- Create a backend service for Tableau
- Name → general-compute-1-tableau-gateway-https
- Protocol → HTTPS
- Timeout → 180 seconds
- Named port → https
- Create a backend for each instance group with the default settings
- Create a health check
- Name → general-compute-1-tableau-gateway-https-health-check
- Description → Checks the health of the Tableau Gateway on all gateway instances in the general-compute-1 cluster
- Protocol → HTTPS
- Proxy Protocol → NONE
- Request Path → /
- Health criteria → default
- Save and continue
- Create
- ~~Create a backend service for Echo and trusted auth~~
- ~~Name → general-compute-1-echo-api-and-trusted-auth~~
- ~~Protocol → HTTPS~~
- ~~Named port → echo-api~~
- ~~Select the node3 instance group~~
- ~~Port numbers → 8080~~
- ~~Create a health check~~
- ~~Name → general-compute-1-echo-api-https-health-check~~
- ~~Description → Checks the health of the Echo API~~
- ~~Protocol → HTTPS~~
- ~~Port → 8080~~
- ~~Proxy Protocol → NONE~~
- ~~Request Path → /healthCheck~~
- ~~Health criteria → default~~
- ~~Save and continue~~
- Create
- Host and path rules
- Create Tableau HTTPS host
- Hosts →
- Paths → /*
- Backends → general-compute-1-tableau-gateway-https
- Hosts →
- ~~Create ECHO API HTTPS host~~
- ~~Hosts →
~~ - ~~Paths~~
- ~~/healthCheck~~
- ~~/tableau/*~~
- ~~/download/*~~
- ~~/admin/*~~
- ~~Backends → general-compute-1-echo-api-and-trusted-auth~~
- ~~Hosts →
- Create Tableau HTTPS host
- Frontend Configuration
- Name → general-compute-1-static-frontend
- Protocol → HTTPS
- IP address → general-compute-1-load-balancer-ip
- Create new certificate
- Name → tableau-strategicinsights-general-compute-1
- Select "Create Google-managed certificate"
- Under domain type
- If you would prefer to use the same certificate you generated on the instance:
- Public key certificate →
.cer - Certificate chain → fullchain.cer
- Private key →
.key
- Public key certificate →
- Create
- Done
- Create
Finishing Up
- Set up Echo API
- Install Echo (and it's requirements) onto Node 1
shell sudo git clone https://gitlab.com/strategicinsights/project-whaleshark-api.git /opt/api curl -sL https://deb.nodesource.com/setup_10.x | sudo -E bash - sudo apt-get install -y nodejs cd /opt/api sudo npm install sudo npm install -g pm2 sudo git checkout <your_branch> - Obtain a certificate for the API
shell tsm stop cd ~/.acme.sh URL=api.cluster.echo.strategicinsights.co.za sudo bash acme.sh --issue --standalone -d $URL --debug sudo cp $URL/$URL.cer /opt/api/$URL.crt sudo cp $URL/$URL.key /opt/api/ tsm start - Setup PM2 and enable startup:
shell
    sudo npm install -g pm2
    sudo pm2 startup
    sudo pm2 start app.js
    sudo pm2 save
- Install Echo (and it's requirements) onto Node 1
- Set up Tableau backups
- Clone the general-compute repo onto Node 1
- Modify
backup.shso it has all the required usernames and passwords - Add the required cron jobs from
crontab.shto your list of cronjobs by pasting them insudo crontab -e
Post Installation Tasks
- Set up Admin & Performance views
- Setup OAuth 2.0 for GCP
- If you need to create new credentials, first read the following:
- Setup the credentials on GCP (Skip this step if there are already credentials for Tableau Server)
- Visit the OAuth consent screen
- Application name → Tableau Server
- Support Email → telkom-insights-software-engineers@googlegroups.com
- Scopes for Google APIs → bigquery.readonly
- Authorized domains → strategicinsights.co.za
- Application Homepage link → https://echo.strategicinsights.co.za
- Application Privacy Policy link → https://echo.strategicinsights.co.za/privacy
- Click Save
- You should be taken to the Credentials screen
- Select "Web Application" and click next
- Name → Tableau Server on general-compute-1
- Authorized JavaScript origins → https://tableau.strategicinsights.co.za
- Authorized redirect URIs → https://tableau.strategicinsights.co.za/auth/add_oauth_token
- Save the credentials provided to a file in the general-compute repo along with the Authorized redirect URI
- Visit the OAuth consent screen
- Setup the credentials on Tableau Server
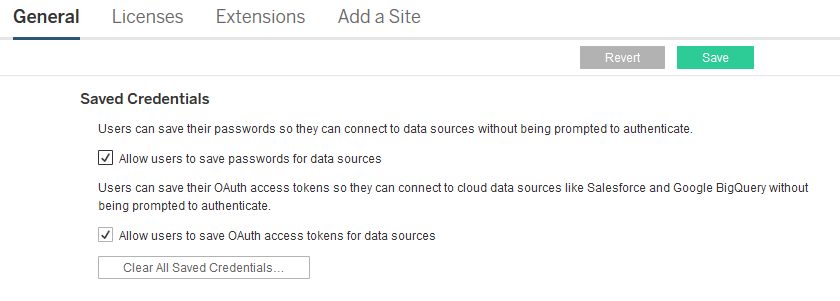
shell tsm configuration set -k oauth.google.client_id -v <your_client_ID> tsm configuration set -k oauth.google.client_secret -v <your_client_secret> tsm configuration set -k oauth.google.redirect_uri -v <your_authorized_redirect_URI> tsm pending-changes apply - The commands for the key in the project
bcx-insightsshell tsm configuration set -k oauth.google.client_id -v 166921109574-rv9un4snbh4ma2169svr4jr85gu2kusa.apps.googleusercontent.com tsm configuration set -k oauth.google.client_secret -v 1sOC_kYreG9UE_1L9skrU00q tsm configuration set -k oauth.google.redirect_uri -v https://tableau.strategicinsights.co.za/auth/add_oauth_token tsm pending-changes apply - Finally, login to Tableau Server and allow users to use saved access tokens as described here